| Ventilator na našem Xtreamerju (ki mu je ljubkovalno ime Storm – saj veste, tista iz X-Men – zato “nevihta” v naslovu) je zadnje čase vedno glasnejši. Spraševal sem po štacunah, pa takega majhnega ni nikjer za dobiti. Sonja je omenila, da oni čakajo, da v Slovenijo pride pasivni hladilnik za Xtreamer, pa sem pošpegal v trgovino in ga našel. V naši Storm ni diska, zato nam enostranski hladilnik čisto zadošča. Kdor je vgradil disk, pa naj si raje omisli dvostranski SideWinder. Na zgornji povezavi so objavili tudi video montaže hladilniki, jaz pa na tem mestu vseeno objavljam tudi lasten set fotografij. Morda bodo komu koristile. | For some time we’ve been using Xtreamer media appliance to view video on the TV and to listen to the music. In the last few weeks its fan has become a real pain in the ... ear. So we invested in a passive cooling system. Double-sided SideWinder is not yet available in Slovenia and anyway our Xtreamer doesn’t heat up much as it doesn’t have a hard drive built in, therefore we bought a single-sided Xtreamer XSC. There are video and photographic instructions available on the internet but still, any additional information cannot hurt, doesn’t it? Therefore, I’m presenting my own pictorial instructions on how to install Xtreamer passive cooling kit. |
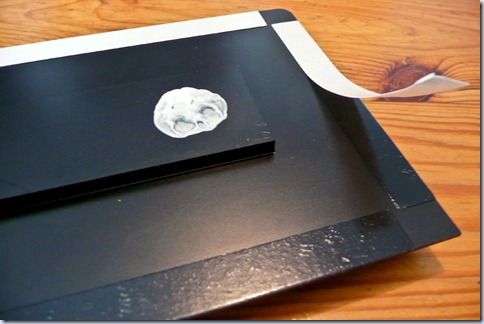
| Najprej je treba odstraniti kovinsko ploščo. Priporočam tanko, a močno rezilo. Zatakneš ga med kovinsko ploščo in plastično ohišje (najbolj tam, kjer je največ prostora – reža ni povsod enako široka) ter zarežeš okoli cele plošče. | First you have to remove the metal side plate. Place the Xtreamer on an appropriate surface (a kitchen table, for example |
| Nato potisnež nož pod ploščo (ne pregloboko, kakšen centimeter bo zadoščal) in narediš še en krog. | Then, push the knife under the plate (not more than half an inch!) and do another circle. |
| Plošča je namreč prilepljena in to lepilo je treba prerezati. Uporabil boš kar precej moči, vseeno pa bodi pri delu previden – večina Xtreamerja je plastična in ne prenaša najbolje rezil. | You’ll have to use quite some strength as you have to cut through the glue. Be careful as you’re working close to the (not very tough) plastic. |
| Nato je treba odstraniti kovinskih hladilnik. Na eni strani je pod plastiko porinjen majhen zobček – tam je treba ohišje rahlo zviti in hladilnik dvigniti. | Next, you have to remove the bright metallic heat sink. It is held in place by a small extruded part, visible on the picture below. |
| Pred vami se prikaže matična plošča in na njej glavni grelec – procesor. To je tista črna kvadratna zadeva s srebrnim krogom. | The Xtreamer internals. Processor – the biggest heat producer – is the black square with silver circle inside. |
| Zdaj je pravi trenutek, da preverite, če se hladilnik lepo prilega Xtreamerju. Pozor – samo en položaj hladilnika je pravilen! En vogal je zaokrožen bolj kakor drugi. | Check if the new heat sink fits well on the Xtreamer. Be careful – the heat sink fits in only one position as all corners are not of the same shape. |
| Nato na procesor naneseš malo (priložene) termalne paste. Ne pretiravaj. | Put some thermal compound (included) onto the processor. Don’t use all of it. |
| Hladilnik postaviš na pravo mesto, pritisneš, snameš in preveriš, če se je termalna pasta lepo razmazala po procesorju. | Put the heat sink into place and remove it. Check if thermal compound has distributed evenly over the processor. |
| Del termalne paste ostane na hladilniku. Ne si usvinjat prstov, zadeva se težko umije! Nato odstraniš zaščito lepila na hladilniku … | Some part of thermal compound will stay attached to the heat sink. Watch the fingers, that stuff is hard to wash off! Remove the protective tape from the glue … |
| … in ga pritisneš na pravo mesto. Pazljivo, lepilo je močno, zato je najbolje, če ti uspe v prvem poizkusu. | … and put the heat sink into place. The glue is quite strong, so it’s best to succeed in the first attempt. |
| Evo, hladilnik je zmontiran! | Done! |
| Zdaj se moraš le še preklikati skozi Xtreamerjeve nastavitve in ugasniti ventilator, ali pa ga pustiti na najmanjši hitrosti. Še najlepše – nadgradnja ne vpliva na garancijo! | The last step is to change the fan speed in Xtreamer settings to minimum speed. You can also disable it completely. I saved the best for the last – the upgrade doesn’t void the warranty! |


Iiiin, zadovoljni? Je zdaj zadeva končno bolj tiha? :))
OdgovoriIzbrišiPopolnoma tiha. Ventilator sem ugasnil in se ga sliši samo še med zagonom mašine.
OdgovoriIzbrišikitty? how do i contact you. please check out my blog for some news and send me an email, okay?
OdgovoriIzbrišihttp://lostintheattic.typepad.com/lost_in_the_atticor_hidin/2010/01/drum-roll-please.html
cheers to you.